How To Connect and Build REST API's with PostgreSQL and NodeJS Complete Tutorial

Software engineer with endless passion to learn more. React | Node.js | MVC architecture
PostgreSQL also called postgres is a free and open-source object relational database management system. It is a highly stable database with a large developer community. It is best suited for systems that require execution of complex queries, or data warehousing, data analysis and works well for all ACID transactions. In this tutorial, let us look at how to connect our Postgres database to nodeJS and later on create a complete REST API CRUD application.
Let's get started!
In this tutorial, let us build REST API's for a blogger's application that let's us get add bloggers, update, delete and view all bloggers.
1. Create a database
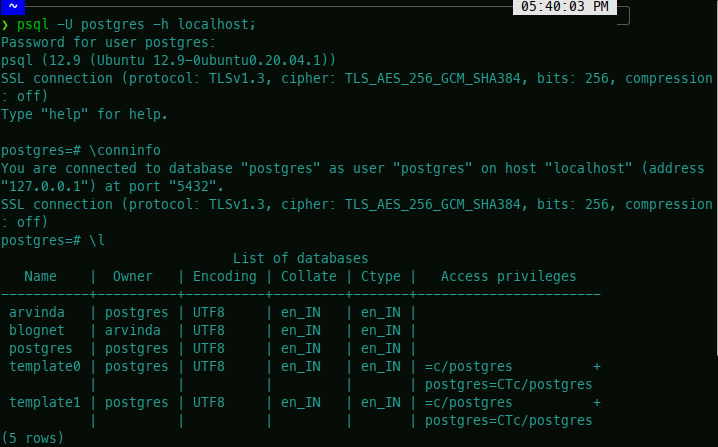
Make sure to install PostgreSQL and pgAdmin on your system. Now, head over to the command prompt and type in:
psql -U <username> -h localhost;
In this tutorial, we will the default in-built superuser postgres.
Create a new database using the following command:
CREATE DATABASE <database name>;
Here, I've used the name blognet
Note: Enter conninfo for more information on which user is connected to what database. Enter \l to view list of all available databases
2. Connect with database
In order to connect with a particular database, use command:
\c <database name>;

3. Configuration
Now, it's time to connect our database with our node.js application. Back in your code editor, create a new file db.js in the root directory and enter the following:
const Pool = require('pg').Pool;

const pool = new Pool({
  user: 'postgres',
  host: 'localhost',
  database: 'blognet',
  password: 'root',
  port: 5432,
})

module.exports = pool
In postgreSQL, there are basically two ways of connecting to a database namely by pool and client. We have made use of pool. Create a pool instance of the Pool class. Give all postgres database credentials namely the user, host, database, password and port.
4. Create Node.js application
Create a node.js application using express framework to create REST APIs. So in the root directory, create a new file index.js and add the following code snippet:
const express = require('express')
const app = express()
app.use(express.json())
const PORT = 3000
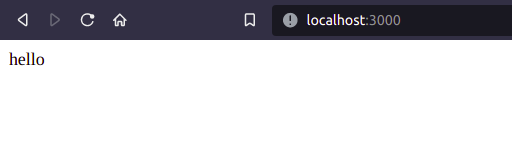
app.get('/', (req, res) => {
res.send('hello')
})
app.listen(PORT, () => {
console.log(`Server running on port ${PORT}`)
})
Now, install nodemon as a dev dependency to automatically restart node application when file changes in directory is deteted. Then, head over to package.json file and update the scripts section

Now, run the application with the help of command: npm start Test if the API endpoint is working as expected.
4. Create blogger table
We can create a table either using pgAdmin tool or in the shell. In this tutorial, let us create it in the shell. So back in the shell, create blogger table using a basic SQL query.
CREATE TABLE blogger (
        ID SERIAL PRIMARY KEY,
        username VARCHAR(255),
        first_name VARCHAR(255),
        last_name VARCHAR(255),
        email VARCHAR(255),
        college VARCHAR(255),
        description VARCHAR(255),
        password VARCHAR(255),
        city VARCHAR(255)
);
Later, we can verify the table by entering \dt to see list of all tables in the database.
5. Create REST API's - GET request
Now, it's time to build REST APIs and work with the blogger table. We can structure our application to reduce redundant code. Create seperate file for queries, controllers and routers.
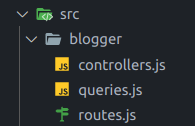
We'll have to connect our business logic in controllers file to the routers. Inside the controllers file, we can add the SQL query to perform CRUD operation.
Let us perform a GET operation to get all bloggers in the database. Create a getBloggers query in queries file
const getBloggers = 'SELECT * FROM blogger'

module.exports = {
  getBloggers
}
Now, connect the query to node.js application. In the controllers file, add the following,
const pool = require('../../db')
const queries = require('./queries')

const getAllBloggers = (req, res) => {
  pool.query(queries.getBloggers, (err, results) => {
    if (err) throw err
    return res.status(200).json({
      length: results.rows.length,
      bloggers: results.rows,
    })
  })
}
Here, we have connected the query to access all the bloggers in the table with the help of a callback function.
Now, we have to connect the middleware to the respective route. This is done in the routes file. Head over to routes file and add the following code snippet,
const { Router } = require('express')
const router = Router()
const controller = require('./controllers')

router.get('/', controller.getAllBloggers)
module.exports = router
Almost done
Now, back in the index.js file, add the following:
const bloggerRoutes = require('../backend/src/blogger/routes')
app.use('/api/v1/bloggers', bloggerRoutes)
Done! Now, to test our GET request, the API endpoint is /api/v1/bloggers
Let us test it!
The output must look something like this,
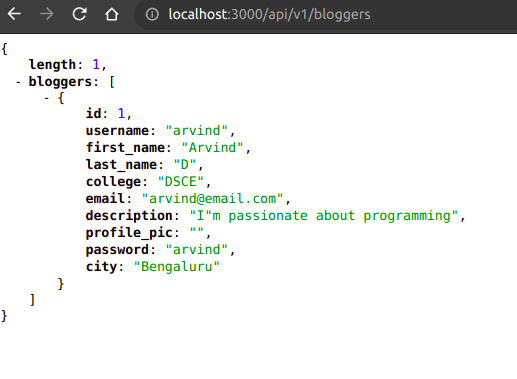
We have successfully queried the database with our API
6. POST route
Let us create a REST API to post or add new blogger to the database.
In the controller file, add the following logic:
const addBlogger = (req, res) => {
  const {
    username,
    first_name,
    last_name,
    college,
    email,
    description,
    password,
    city,
  } = req.body

  //check if email or username is already taken
  pool.query(queries.checkEmailExists, [email], (err, results) => {
    if (results.rows.length) {
      return res.status(200).send('email or username already exists')
    }
  })

  pool.query(queries.checkUserNameExists, [username], (err, results) => {
    if (results.rows.length) {
      return res.send('username already exists')
    }
  })

  // add blogger to db
  pool.query(
    queries.addBlogger,
    [
      username,
      first_name,
      last_name,
      college,
      email,
      description,
      password,
      city
    ],
    (err, results) => {
      if (err) throw err
      res.status(201).json({
        success: true,
        message: 'Blogger created successfully!',
      })
    }
  )
Here, we extract the fields from the users and validate if the given username and email already exists. If all conditions are passed, we add the blogger to database. Go to the queries file and add the following query to add a new blogger
const addBlogger =
  'INSERT INTO blogger (username, first_name, last_name, college, email, description, password, city) VALUES ($1, $2, $3, $4, $5, $6, $7, $8)'
Now, finally in the routes file, add this route with the POST request to get data from user.
router.post('/', controller.addBlogger)
Go to postman and check if the API is working as expected.
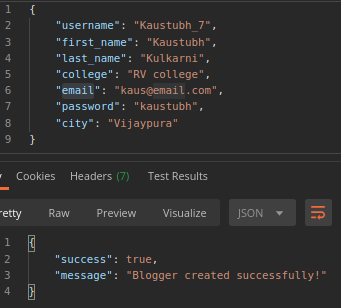
Now, the GET route must also be updated to get or access the new blogger.
7. UPDATE route
We can update the existing blogger using the update or put request to the server. Starting with queries file, add the following code snippet:
const updateBlogger =
  'UPDATE blogger SET first_name=$1, last_name=$2 WHERE id=$3'
Update module.exports to include the given route.
Now, in the controllers file, let us the business logic to update blogger's information:
const updateBlogger = (req, res) => {
  const id = parseInt(req.params.id)
  const { first_name, last_name } = req.body

  pool.query(queries.getBloggersById, [id], (err, results) => {
    const noBloggerFound = !results.rows.length

    if (noBloggerFound) {
      return res.status(422).send('No blogger found with given id')
    }

    pool.query(
      queries.updateBlogger,
      [first_name, last_name, id],
      (error, results) => {
        if (error) throw error

        res.status(200).json({
          message: 'Successfully updated',
        })
      }
    )
  })
}
Here, we initially check if given id of blogger exists. In our example, let us update the first name and last name of blogger. Make sure to also update module.exports to include the given function.
And finally in the routes file, add the following route
router.put('/:id', controller.updateBlogger)
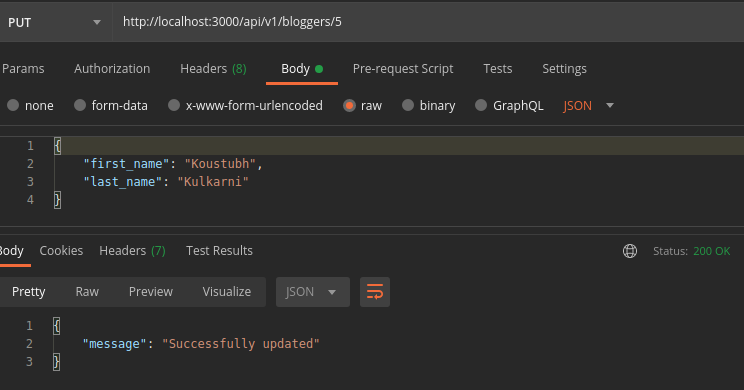
Now, head over to postman and check if the API is working
It must look something like this.
congratulations, you have successfully built the update route. Now, let us head over to DELETE request.
8. DELETE route
Now, let us develop an API to delete a particular blogger from the database.
const deleteBlogger = (req, res) => {
  const id = parseInt(req.params.id)

  pool.query(queries.getBloggersById, [id], (error, results) => {
    const noBloggerFound = !results.rows.length
    if (noBloggerFound) {
      return res
        .status(422)
        .json({ message: 'Blogger with given id is not found in database' })
    }

    pool.query(queries.deleteBlogger, [id], (err, results) => {
      if (err) throw err
      res.status(200).json({
        message: 'Blogger deleted successfully',
      })
    })
  })
}
Similar to the update route, we check for input validations for the blogger id. Now, we need to create query deleteBlogger. So in the queries file:
const deleteBlogger = 'DELETE FROM blogger WHERE id = $1'
Now, we let add the route for to delete specific blogger by id:
router.delete('/:id', controller.deleteBlogger)
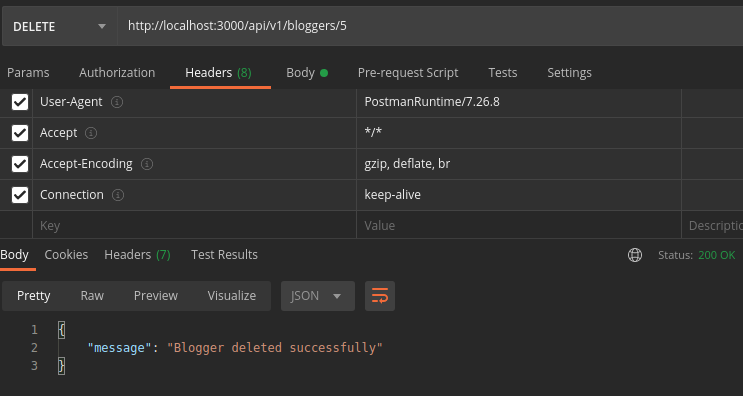
Go to postman and check if the API is working as expected. The output must look something like this
DONE!!! You have completed all CRUD applications using the postgreSQL database.
Conclusion
We have worked with node.js and postgreSQL database to build basic API to add, update, view and delete bloggers from the database.
Hope you found this tutorial really useful. Please like and share. Do let me know if you're facing any issues along the way.
Happy coding!

