What is an API? An API is a common terminology we've all come across in the internet world. But what is it and why is it used?
In layman terms, an API(Application Programming Interface) acts as translator for two machines communicating over a web service. It's a formal way to describe two computers communicating directly with one another. There are various type of APIs and web API are a part of them which allow for the transfer of data over the world wide web. This concept is an example of client server architecture. It’s sometimes referred to as a contract between an information provider and an information user—establishing the content required from the consumer (the call) and the content required by the producer (the response).
 Why use APIs?
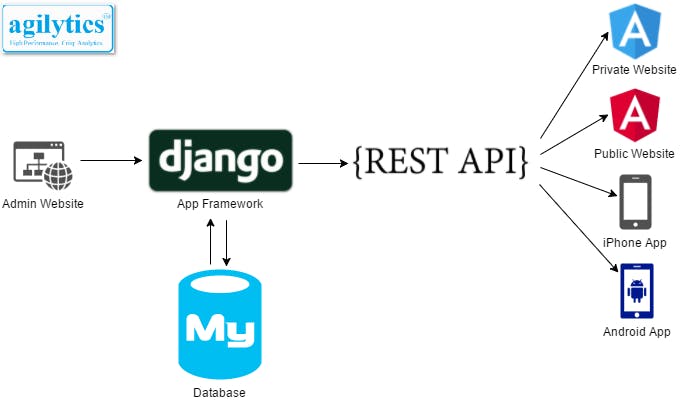
One of the key advantages of REST APIs is that they provide a great deal of flexibility. As we can see in the given image, data can be shared through any external client(any frontend framework like react or vue or desktop or smartphone applications). This way, a developer can seperate the backend logic and database from the frontend. Most basic file format used by api is JSON. Most common kind of web api is REST(REpresentational State Transfer).
Why use django rest framework?
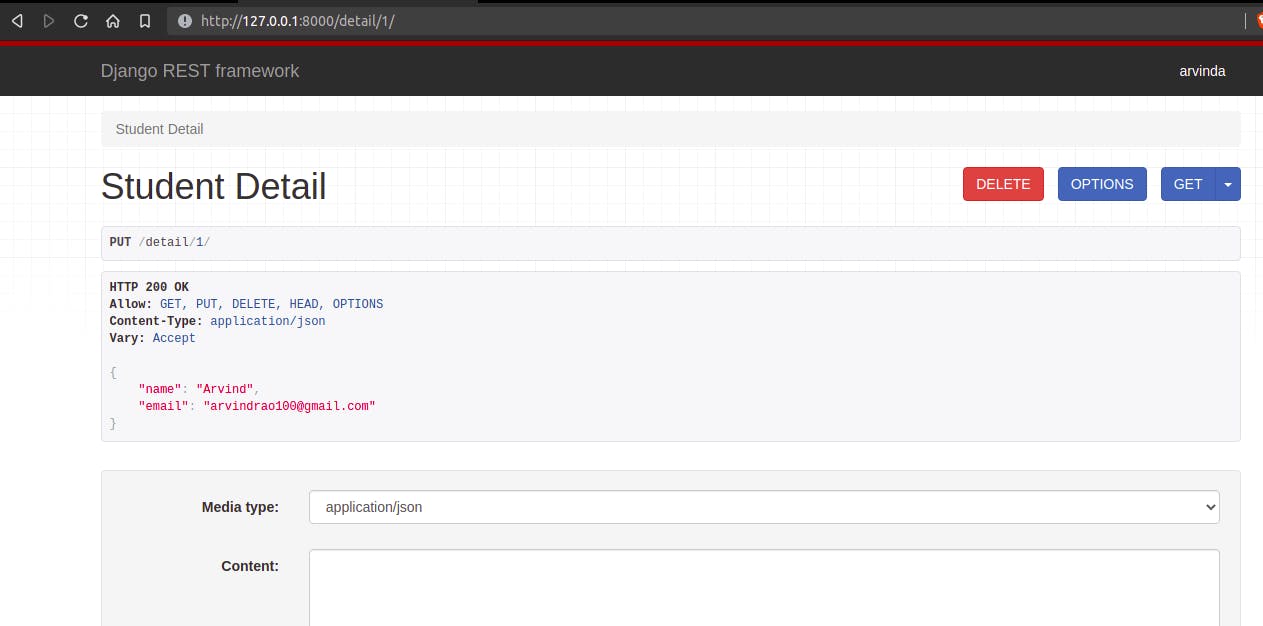
It has a web browsable API that facilitates interaction with RESTful web service through any web browser. It makes surfing through the API and can make different HTTP requests much easier and faster. It is widely used by developers due to its merits on authentication policies, flexibility, quality, and well written documentation and generic classes for CRUD operations which we'll talk later on.
Client requests for information that is provided or responded by the server. Django rest is mature, full of features, customizable, testable, and extremely well-documented.
Please refer the official documentation for more information about the Django REST framework, django-rest-framework.org
In this tutorial, let us learn how to build Restful API using Django REST framework. First make sure you've set up virtual environment and install necessary dependencies.
virtualenv drfenv
source drfenv/bin/activate
pip install django
pip install djangorestframework
Now create a new django project and an app:
django-admin startproject drf-tutorial
cd drf-tutorial
python manage.py startapp drfapi
Now, make sure to go into settings.py file and add 'rest_framework' and 'drfapi' into INSTALLED_APPS.
Serializers:
It packages unpackaged data when going to server and unpackage or deserializes data when out of server such that it can be read by client. Get data and output it in format that can be read by other technologies(Here it is JSON data). It works similar to django forms. API can communicate with multiple technologies which take JSON as the input.
Okay, now let's first create models.py file with Student as an example.
from django.db import models

# Create your models here.
class Student(models.Model):
    name = models.CharField(max_length=100)
    age = models.IntegerField(null=True, blank=False)
    email = models.EmailField()

    def __str__(self):
        return self.name
Now run the database migrations:
python manage.py makemigrations
python manage.py migrate
You can create superuser and add model Student to your admin.py. Make sure everything runs successfully.
Now, it's time to serialize. We could serialize it using Serializer or any other classes. For this tutorial, we'll stick with ModelSerializer. This reduces amount of code.
from rest_framework import serializers
from .models import Student

class StudentSerializer(serializers.ModelSerializer):
    class Meta:
        model = Student
        fields = ['name', 'email']   # all fields that json data will have
Class based views: We can write API views using Class based views. Using class based views helps in reuseability and code extendability i.e., CBV can be extended to include more functionalities using Mixins.
from rest_framework.views import APIView
from rest_framework.response import Response
from rest_framework import status
from .serializer import StudentSerializer

class StudentAPIView(APIView):
    def get(self, request):
        students = Student.objects.all()
        serializer = StudentSerializer(students, many=True)
        return Response(serializer.data)

    def post(self, request):
        serializer = StudentSerializer(data=request.data)

        if serializer.is_valid():
            serializer.save()
            return Response(serializer.data, status=status.HTTP_201_CREATED)
        return Response(serializer.errors, status=status.HTTP_400_BAD_REQUEST)

class StudentDetails(APIView):
    def get_object(self, id):
        try:
            return Student.objects.get(id=id)
        except Student.DoesNotExist:
            return Response(status=status.HTTP_404_NOT_FOUND)

    def get(self, request, id):
        student = self.get_object(id)
        serializer = StudentSerializer(student)
        return Response(serializer.data)
    def put(self, request, id):

        student = self.get_object(id)
        serializer = StudentSerializer(student, data=request.data)
        if serializer.is_valid():
            serializer.save()
            return Response(serializer.data)
        return Response(serializer.errors, status=status.HTTP_400_BAD_REQUEST)

    def delete(self, request, id):
        student = self.get_object(id)
        student.delete()
        return Response(status=status.HTTP_204_NO_CONTENT)
Let's break down what's happening here.
In main urls.py:
from django.urls import path, include

path(include('drfapi.urls'))
Create urls.py in drfapi:
from django.urls import path
from .views import StudentAPIView, StudentDetails

urlpatterns = [
    url(r'^admin/', admin.site.urls),
    url('student/',  StudentAPIView.as_view()),
    url('student_detail/<int:id>/',  StudentDetails.as_view())
]
Now, run the django virtual environment
python manage.py runserver

Congratulations!!! You just built a basic student api. It performs all basic CRUD operations and returns data in JSON format that can be used by other external clients.
We have come to the end of this tutorial. Thank you for reading this far. This post is just the tip of the iceberg considering the number of things you could do with REST API. Feel free to connect with me on GitHub https://github.com/arvind73
THANK YOU.
Happy coding!!